Table of Contents
The angle grinder is a highly versatile tool that should be in the collection of anyone starting an at-home workshop. From polishing to carving, grinding to cutting, there isn’t a lot that these amazing power tools are capable of.
If you’re in the early stages of using one of these tools or are considering adding one to your arsenal then there are a few important things you need to know. In this detailed beginner’s guide, we will be looking at everything you will need to get started with your angle grinder confidently and safely. Let’s begin.
Angle Grinder Uses – What Can You Do With An Angle Grinder?
One of the biggest benefits in using an angle grinder is that there are so many uses for these tools. While a lot of the pieces of equipment in your workshop will have a single use, your angle grinder will be something that you employ during almost all of your projects.
Cutting
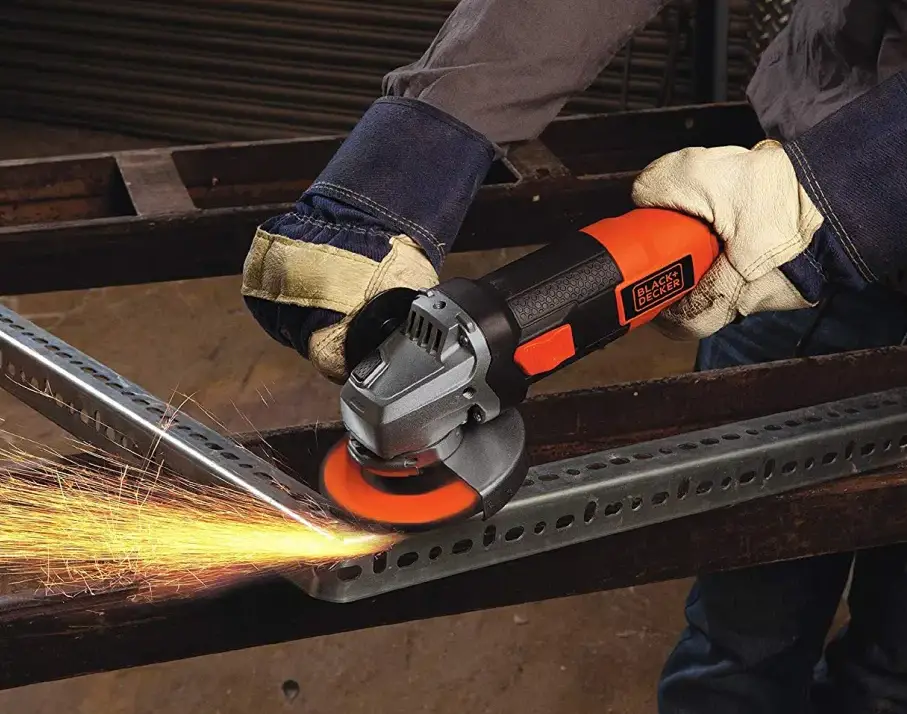
While you probably have an array of saws already in your tool kit, if you ever needed to take one tool with you that had the ability to cut, you would probably choose your angle grinder. Cutting through metal is perfectly viable with an angle grinder using a metal cut off wheel. Although depending on the thickness, it may take a little more patience than you are used to.
They are ideal for cutting through metal bars but will also make a great choice for cutting more delicate materials such as stone and tiles. If you’ve ever tried to notch a tile when laying them around an obstacle such as a toilet or angle in the wall, you’ll know how tricky this can be. However, using an angle grinder is widely agreed to be even easier than using a standard tile cutter. In this instance, you would need to use a diamond wheel to get the most effective cut.
https://www.youtube.com/watch?v=b5afGQFFlRY
Carving
Carving materials requires a special type of attachment, especially if you will be working with wood, such as the Arbortech Industrial Woodcarver Blade. However, provided that you have this wheel, your angle grinder will be incredibly adept when it comes to carving.
This is a practice that is often referred to as power carving and there are a lot of tutorials online if you’re looking for ideas. While the angle grinder might look like something of a bulky tool, it is surprising just how intricate some of the carvings it can make are!
Grinding
The clue is in the name of the tool so it probably doesn’t come as much of a surprise than your angle grinder can be used to grind. In fact, this is the purpose the tool was designed in the first place. When we said that angle grinders were versatile tools, we weren’t kidding; where grinding is concerned, you will be able to work with a vast number of materials. That said, it is important to ensure that you have the right attachments otherwise you won’t find the job as easy and you could end up damaging your tool.
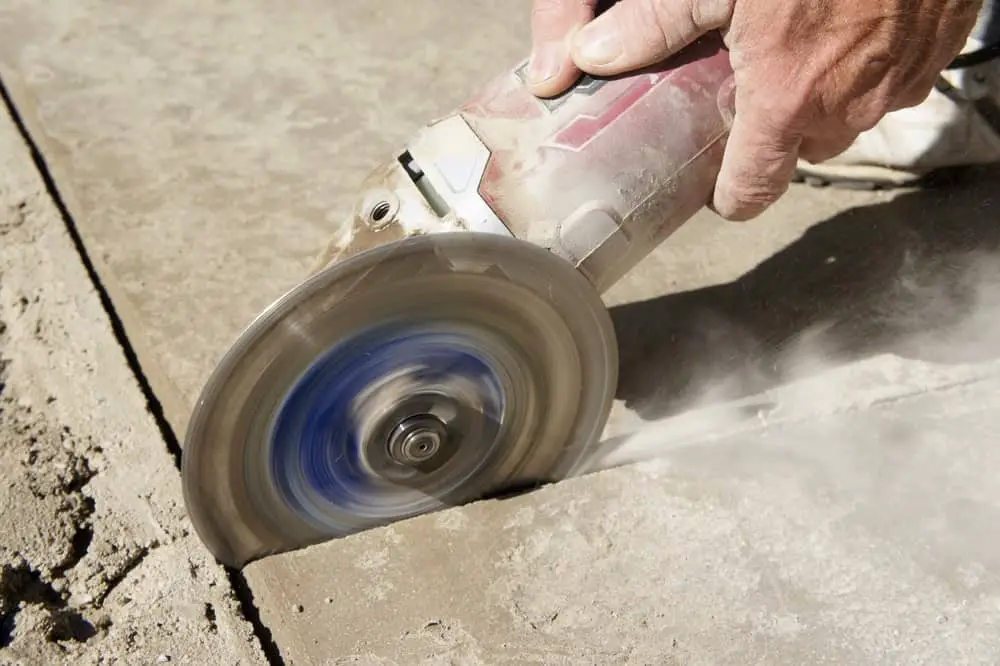
Most commonly, various types of metal are ground using an angle grinder but it is possible to work with other materials. Concrete is a great example of this but we should point out that a lot of dust can fly off when doing this, so always use a mask and preferably a stream of water to dull the dust cloud.
Removal Of Grout Or Mortar
If you’re working in an area where grout or mortar has adhered to a surface, this can be incredibly difficult to remove by hand. While it is possible, it can take a very long time whereas using an angle grinder will have it removed far more quickly.
There are tuckpointing diamond wheels available which are excellent for this type of work. What’s great is that they will successfully remove any mortar or grout without causing any damage to the surface underneath.
Much like many jobs that involve using an angle grinder, removing grout and mortar; particularly the latter can create a lot of dust. In this instance, we should remind you of the importance of wearing a dust mask.
Deburring
Deburring refers to a process in which excess material is removed from a project. This is something that we often see in metalwork and involves taking off small pieces of sharp metal that have formed, typically during the earlier stages of production.
If you are working on a metal project, you will need to make sure that the material undergoes a deburring to make it safer to handle as well as improving how it functions. The rough edges of the metal will be smoother and you will have a much more even final result. What’s great is that all of this can be achieved with your angle grinder using the suitable attachments.
Finishing and Polishing

Even after you have ground a material to reveal its surface, you might not be pleased with the surface you are left with. But in steps the angle grinder once again because these tools can also be fitted with smoothing and polishing attachments that allow you to smooth the texture of any given material.
If you are looking to create a uniform look then popping on a flapper pad will allow you to do this. Using your angle grinder for this purpose may alter both the texture and colour of the material which is ideal for putting the finishing touches on your project. Moreover, you can use this feature of the angle grinder to round off edges and smooth out any sharp bits.
In terms of polishing, this is a much more delicate operation and can be achieved through the use of a polishing pad which is typically made of a soft material like cotton. While this finishing effect could be done by hand, this is often a time-consuming task and using your angle grinder instead can make the work much quicker and will likely give a more even result.
Angle Grinder Jig
An angle grinder jig is an optional add-on that aids you when making a cut. In essence, the angle grinder jig allows the tool to function more like a chop saw which can make things much more steady when cutting materials.
One of the best ways to install an angle grinder jig with your tool is to go down the DIY route; after all, this will be another project you can get your teeth into.
There are a whole host of tutorials, articles and videos on the internet that tell you how to do this but we found that this video was pretty informative and simple to follow.
Angle Grinder Parts
Before you can begin using your new angle grinder, you will need to familiarise yourself with the various parts. Not only will this allow you to better understand how to use the tool but it will also give you the relevant knowledge when it comes to maintaining it.
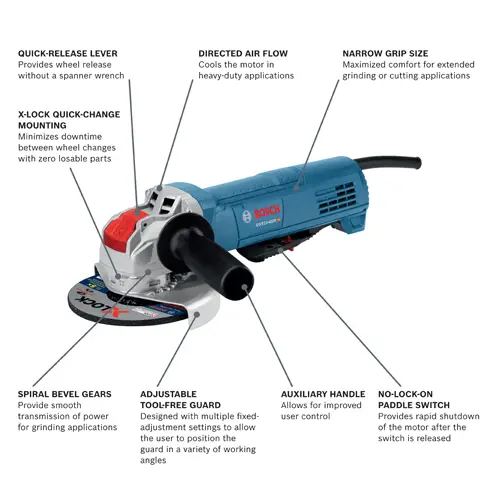
Spindle Or Arbor
When you use an angle grinder, you won’t always need to use the same disc or blade and so these are interchangeable. The part which your wheel sits on is called the spindle or arbour. This spindle is powered by the tool’s motor and is the part that will spin when the discs are attached.
While these may come in different sizes depending on the tool and country in which it is sold, the standard size here in the UK is 22mm / ⅞”. That said, there are some tools that feature adaptable discs that have two small flanges allowing you to adjust the size from ⅝” to ⅞”. In any case, you should check that any discs you purchase are compatible with the size of your angle grinder’s spindle.
Spindle Lock
For safety reasons, your angle grinder will feature a spindle lock. When this is engaged, the wheel is prevented from turning which means that you can safely remove and replace the discs.
Safety Guard
Angle grinders can be dangerous tools if they are not used correctly and as such, manufacturers include a safety guard which is sometimes known as a wheel guard. In any case, this part of the tool works to protect the user.
As the angle grinder is in use, there may be sparks flying from the fast-rotating wheel as well as small pieces of debris. While wearing the correct safety gear will go a long way in preventing injuries, this safety guard will act as a first line of defense against flying debris or sparks.
On/Off Button
Quite simply, the on/off button will be used to operate the tool, turning the power on and off again.
Lock Button
Another great safety feature that almost all angle grinders have is the lock button. This allows the user to activate a lock to keep the tool in the on or off position.
Speed Switch
In the main, angle grinders will come with a single-speed setting but there are more sophisticated tools out there that boast variable speed options. In this case, there will be a speed switch that can be used to alternate between these. This is a good option to have if you need to use the tool for more versatile projects and is ideal for those buying an angle grinder for professional use.
Side Handle/Support Handle
While the angle grinder can be handled from the top, these tools also have a handle located at the side which allows the user to get a better and more controlled grip on the tool.
Blades / Discs
Angle grinder discs/blades are used for projects that require cutting and they come in various forms. One of the most common types of blade is the diamond blade which is incredibly robust and can be used to cut through tough metal. While its name may lead you to believe that it is made from diamond, these blades actually feature synthetic diamond (the real thing would be far too costly) that replicate the strength of this solid material.
Angle Grinder Spanner
Your angle grinder will also come with an angle grinder spanner which is used to safely remove the discs. While it is possible to do this without an additional tool, it can be very dangerous and should certainly not be attempted by a beginner. In absolute emergencies, you can follow these instructions to remove the disc without a tool.
Accessories
As well as the many discs and blades that your angle grinder will come with, there is a multitude of accessories that can make your tool much more versatile. This might include any number of things but most commonly, you will receive accessories like wire brushes, polishing discs and flap discs.
How To Use An Angle Grinder To Cut Metal
Cutting metal is one of the things that most people find useful about angle grinders; after all, you need a pretty robust tool to get through this thick, dense material. Once again, we must refer you to the safe use of an angle grinder so be sure to check out our guide before getting started.
You’ll first need to make sure that you choose the right blade for the job. A metal cut off blade is the most common type although there are certain diamond blades that can be used for metal. While this type of blade is typically used for things like stone and concrete, there are some that are specially manufactured for metal. You will also be able to find multi-cutting discs which can be used for various applications but just make sure that the one you choose is compatible with the material you intend to cut.
The thickness of the blade is also an important consideration and as a general rule, you will need something between 1mm and 1.8mm for lighter metals like stainless steel. However, if you are working with denser, heavier metals you might need to go for something up to 2.5mm. It is important to keep in mind that when you are using a thicker wheel, the cutting speed will be reduced. This could cause a greater build-up of friction which could mark the material you are cutting.
You will also notice that cutting discs come in different shapes; flat and depressed or raised. Raised and depressed discs are usually used for getting into tight corners since they allow the user to achieve a different entry angle to the metal. However, these types of discs should not be driven all the way through a piece of material.
Now you have chosen the right type of blade, you will need to prepare to make the cut by clamping your material close to where the cut will be made. Before bringing your tool to the metal, you should allow it to run for a few moments to ensure that everything is in balance. Any problems, turn the tool off and realign the disc ensuring that everything is functioning as it should be before trying again.
When you make the cut, you should always begin at a 90-degree angle and be aware that sparks will fly so be sure that the safety guard is in place. It is also important to keep in mind that the disc will do most of the work and it is your job to guide it rather than forcing it into the metal.
Once you have made your cut, you can use other wheels on your angle grinder to finish the piece by deburring and smoothing.
https://youtu.be/j2QrgYkHUJw
Video demonstrating how to cut metal with an angle grinder
Can Angle Grinders Cut Wood?
Angle grinders are mainly used to work with tougher materials such as metal. However, it is possible to use them to cut wood but this must only be done when using the correct type of blade. If you attempt to use a blade designed for cutting metal on a material that is combustible, the results won’t be pleasant.
Moreover, you must think about kickback. Kickback, as you probably know, is when pieces of material fly back towards the user. In some cases, kickback is responsible for some pretty nasty injuries so you will want to avoid it at all costs. But when you use a blade that is meant for cutting dense material like metal on wood, kickback becomes far more likely.
The pressure that metal puts back on the blade means that kickback is a rare occurrence. But with wood being much softer, these robust blades will likely tear it to shred sending debris flying in your direction. What’s more, should you slightly mis-angle the tool at any point, it can fly out of control and what happens after could be catastrophic.
Now, we have told you that it is possible to use a special wood blade in an angle grinder, but in all reality, it is better to opt for a different tool whose sole purpose is to cut wood. Why not consider a circular saw as a safer alternative?
How To Change Angle Grinder Blade / Disc
Knowing how to change the blade on your angle grinder is one of the first and most important things that you should learn to do. Without this knowledge, you cannot operate your tool. Let’s take a look at our quick step by step guide:
- Before you begin, you should make sure that the angle grinder is disconnected from its power source. While it can be tempting to think ‘it’ll be fine’ there is always a chance, however small, that you could accidentally start the tool and the few seconds it takes to disconnect it are worth avoiding a serious injury.
- The safety guard can be removed and this will make changing the blade much easier. Depending on the tool you have, this aspect may be removed using either a latch or a screw.
- You will now need to locate the blade lock button and press this, holding it in. Again, each tool will vary and the lock button may be positioned near the trigger or on the top of the tool.
- Flip your angle grinder over so that the wheel is pointing upwards. Take your spare hand and try to turn the wheel, if it is locked, it will remain in place. Sometimes, the lock button may not engage the first time resulting in the wheel turning. In this case, release the button and try again.
- There is a nut on the spindle and this can be loosened using the angle grinder wrench that came with your tool. This will typically need to be turned in an anti-clockwise direction
- The blade should now simply lift and a new blade can be put in its place. Be sure to tighten the arbor nut back up before using the tool again. It can be tempting to tighten this too much but there is no need; just enough to keep the disc in place will be sufficient.
Conclusion
If you are looking for a versatile tool then you won’t find much else quite like the angle grinder. However, these can seem like intimidating tools for people who have never used one before. Our guide gives you all the information you will need to get to know your angle grinder and make the most out of it.