Table of Contents
You’ve got your new mitre saw. You’ve got a project in mind. But, there’s one problem. You don’t know where to start.
If you’re unsure of how to use a mitre saw, you’re not alone. Everyone has to start somewhere and all it takes is a little knowledge and some practice before you are confidently using your saw.
In this guide, we will be giving you some important tips on how to use a mitre saw as well as addressing some of the most common problems.
Mitre Saw Instructions
Before you turn on the power and start using your mitre saw for the first time, it is essential that you are familiar with how it operates. We don’t want to try and teach you to such eggs here but it’s important to point out that cutting equipment like this can be dangerous when used incorrectly.
One of the first things you should do is to carefully read the user manual that came with your tool. If you happen to have purchased one second-hand and a user guide wasn’t supplied, you can find these online.
But we wanted to create a quick reference guide for those times when you need to check back, rather than referring to a lengthy user manual. Take a look at our tips for using a mitre saw.
Mitre Saw Safety
As we have mentioned, safety should be your first priority. With more than six and a half thousand mitre saw injuries each year, these are potentially dangerous pieces of equipment, so before you begin your first woodworking project, be sure to look over these important safety tips.
- Keep your fingers away from the blade. As a general rule, you should aim for 15cm of clearance between you and the blade path.
- Never reach underneath the blade while it is in motion.
- Always wear protective eye goggles when operating the saw, this will prevent any debris from causing eye injuries.
- If you are performing maintenance on the saw, for example, changing the blade, be sure to disconnect the power. If you are using a cordless model, the battery can be removed.
- Once you have finished making a cut, allow the blade to come to a complete stop before lifting it and removing the wood.
Using Your Mitre Saw
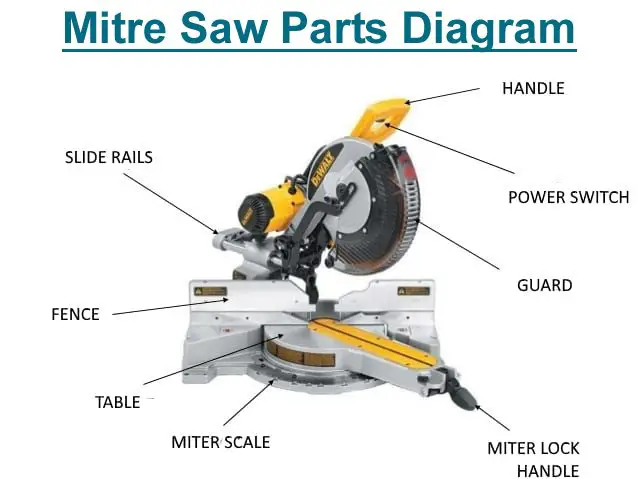
If you have never used a mitre saw before, it can seem like a complex piece of equipment. It is therefore essential that you familiarise yourself with the various components of your new tool. Take a look at this mitre saw parts diagram before you start:
You are now ready to start preparing your first cut. We have laid out some easy to follow instructions to get you started.
- There’s an old rule in woodworking, which we are sure you are familiar with; ‘measure twice, cut once.’ This couldn’t be more fitting than when using a mitre saw since these tools tend to have blades that are ⅛ inch in thickness, so you need to be certain that you have everything marked out correctly. Using a pencil, mark your wood where the cut will be made.
- Keeping your hands safe when using a mitre saw is made much easier thanks to the clamp. Before you start cutting, you will need to position your wood along the fence and use the clamp, keeping the wood at least 15cm from the blade. Most clamps will come with adjustment knobs for tightening.
- You will need to set the mitre and bevel angles to suit the cut. In some cases, you won’t be cutting at an angle so you’ll just need to make sure that both options are set to zero.
- It’s not time to turn on the saw. Once it’s going, allow it to reach its full speed before you bring it to the wood.
- Take your time making the cut, especially if you are a beginner. You should begin at the front and move the saw to the back of the wood. This is the best way to prevent kickback from happening.
- When you have finished making the cut, allow the blade to stop moving and then lift it and take away the wood.
Mitre Saw Problems
There is always a chance that things might not go quite according to plan when using your mitre saw. However, for the most part, these issues can be easily fixed. You will usually find that making small adjustments in the way that you operate the tool can make a world of difference.
With that in mind, let’s take a look at some of the most common mitre saw issues and how to fix them.
Mitre Saw Kickback
Kickback is not something that should be taken lightly. This happens when the saw blade binds with the piece of wood, or whatever material you are working with. As this happens, the material can come flying back towards you. Of course, you may end up with an injury as a result of being hit by the wood but even worse, this can cause your hand to be pulled into the blade.
Using a clamp is one of the best ways to stop kickback from happening, however, in some cases, you may find that the piece you are cutting is too small for use with a clamp. In this instance, you can secure the material to a board using double-sided tape. This board can then be clamped, allowing for much safer operation.
Mitre Saw Guard Problems
One of the most common mitre saw guard problems is that the guard ends up sticking. In a lot of cases, this happens after owning the tool for some time, so users think that the tool has had it and are tempted to replace it.
But that isn’t usually necessary. Most mitre saws will last many years when properly taken care of and when the guard starts sticking, it is typically an obstruction.
Most commonly, you will find that sawdust has become trapped in the rotating bearing of the guard. You will usually find that the guard will still have some movement and freeing up the obstruction will normally solve your issue.
If this is not the problem, a lot of users find that the issue lies with the locking mechanism. Many times, this locking mechanism is located somewhere less than apparent and some users, therefore, miss this. Locating the locking mechanism and checking that it is not bent or otherwise damaged will allow you to free up the guard’s movement.
Mitre Saw Not Cutting Straight
There is nothing quite as irritating as your cut not coming out as accurate as you had hoped. However, for the most part, this problem is usually easily solved.
Most of the time, this problem is caused by the material not being correctly and securely clamped. As the wood is pulled towards the blade, it can be thrown off track if it is not secure.
However, if your mitre saw is not cutting square, you may also find that there could be a problem with the blade, the fence or the bevel gauge. To fix the problem, you should check the function of each component to make sure that everything is in good working order.
Mitre Saw Projects
A mitre saw is an extremely diverse tool which allows you to tackle a wealth of projects. But if you’re just getting started and have finished the project that you perhaps purchased the tool for, you might be looking for inspiration on your next challenge.
These cutting tools are designed to cut angled cuts which makes them ideal for things like picture frames, ornate planters, trimming plain furniture for a more detailed aesthetic and many other things. The only limit is your imagination.
Conclusion
Because mitre saws are such versatile pieces of equipment, many woodworkers find that they cannot live without them. They are undoubtedly a great addition to the workshop but it is important that they are used correctly, this will help to prevent accidents and result in a much better cut.